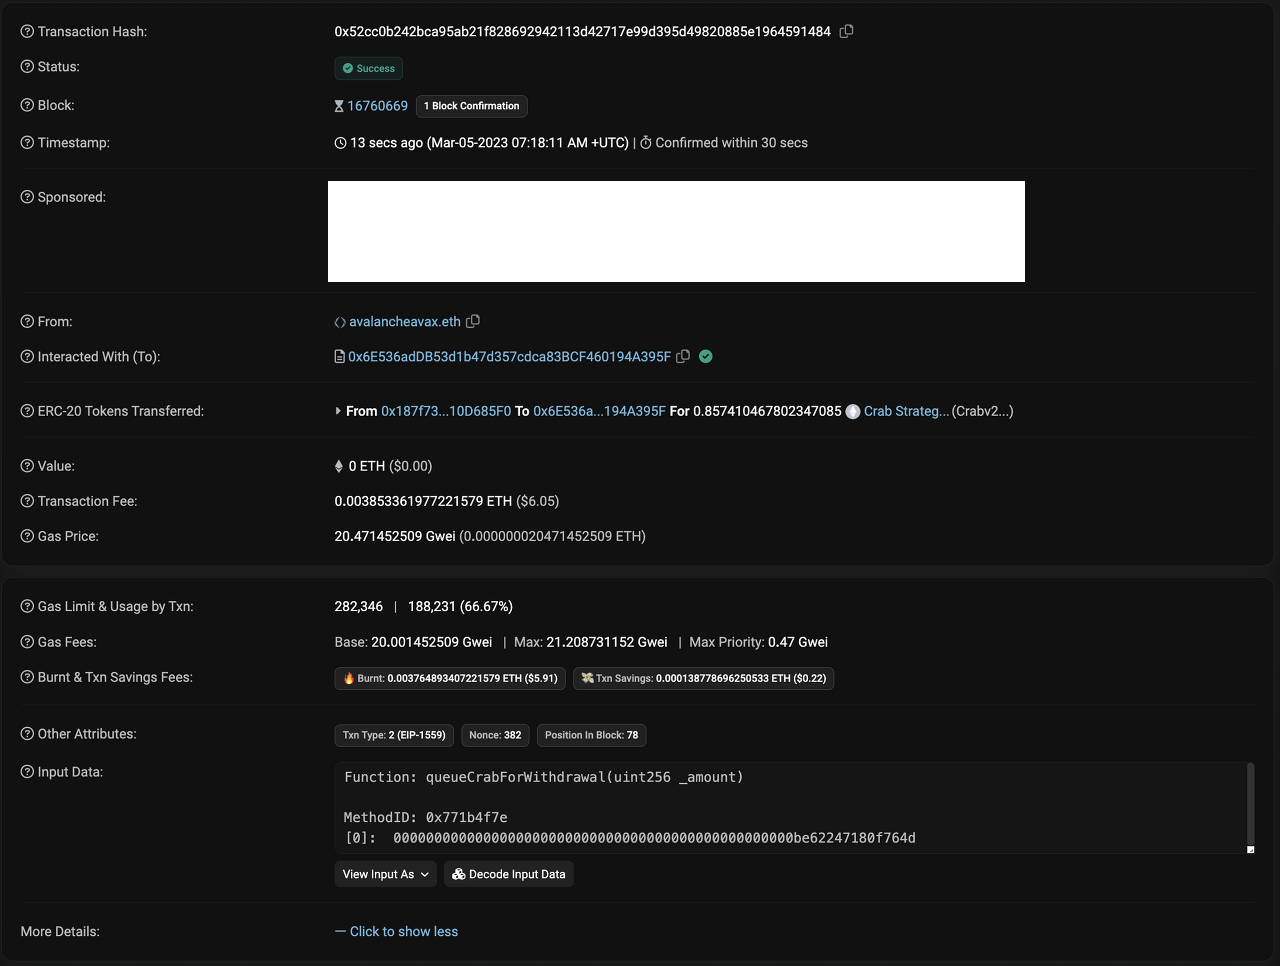
지난 시간에는 블록 페이지에 대한 분석을 했었다. 이번에는 트랜잭션 페이지에 있는 데이터들을 살펴보려 한다.
블록 페이지와는 다르게 트랜잭션 페이지는 여러 페이지로 나누어져 있다. 크게 Overview, Internal Txs, Logs, State, Comments로 나눌 수 있는데 오늘은 Overview 페이지를 다룬다.

먼저 바로 채워줄 수 있는 필드를 알기 위해 ethclient에서 해당 트랜잭션 데이터를 가져와보자.
{
  "type": "0x2",
  "nonce": "0x17e",
  "gasPrice": null,
  "maxPriorityFeePerGas": "0x1c03a180",
  "maxFeePerGas": "0x4f0238e10",
  "gas": "0x44eea",
  "value": "0x0",
  "input": "0x771b4f7e0000000000000000000000000000000000000000000000000be62247180f764d",
  "v": "0x0",
  "r": "0x35d709059327cca8236b355e38b63bb2c91137a399c3c57037051c94c4f05a11",
  "s": "0x54be4a5ac2b09f48d8bcbf663ef9d4769059206a32ed3013f1f4acd93bc5f1d0",
  "to": "0x6e536addb53d1b47d357cdca83bcf460194a395f",
  "chainId": "0x1",
  "accessList": [],
  "hash": "0x52cc0b242bca95ab21f828692942113d42717e99d395d49820885e1964591484"
}
이더스캔의 블록 페이지에서 필요한 항목들을 정리하고, 바로 얻을 수 있는 데이터는 취소선으로 지워보면 아래와 같다.
Transaction Fee, Gas Price, Burnt & Txn Savings Fees, Other Attributes = ( |
하나씩 알아가보자.
Status
Status는 트랜잭션이 성공하면 success, 실패하면 fail 값으로 표시된다. 트랜잭션의 실패 여부는 어떻게 알 수 있을까?
트랜잭션이 성공하건 실패하건(노드로 보내기도 전에 실패한 것은 미포함) Receipt가 만들어지고, 그 안에 Status 값을 확인해야 한다.
- 0 transaction has failed (for whatever reason)
- 1 transaction was succesful.
| // 성공 트랜잭션 {"type":"0x2","root":"0x","status":"0x1","cumulativeGasUsed":"0xcb55e8","logsBloom":"0x00000000000000000000000000000000000000000000000000000000000000000000000000000000000000000000000000000000000000000000000000000000000000000000000000000000000000000000000000000000000000000000000000000000000000000000000000000000000000000000000000000000000000000000000000000000000000000000000000000000000000000000000000000000000000000000000000000000000000000000000000000000000000000000000000000000000000000000000000000000000000000000000000000000000000000000000000000000000000000000000000000000000000000000000000000000","logs":[],"transactionHash":"0xb88ff865d55a9b2008144bb778a6a3f13bed3069456ca77dac1f80f3ea6916a7","contractAddress":"0x0000000000000000000000000000000000000000","gasUsed":"0x5208","blockHash":"0x819ad47f3df939fb8dc5adaf8ccc40cf9e30538855eb661f24ea282e2e232bf5","blockNumber":"0xffbfa8","transactionIndex":"0x73"} // 실패 트랜잭션 {"type":"0x2","root":"0x","status":"0x0","cumulativeGasUsed":"0xc0b196","logsBloom":"0x00000000000000000000000000000000000000000000000000000000000000000000000000000000000000000000000000000000000000000000000000000000000000000000000000000000000000000000000000000000000000000000000000000000000000000000000000000000000000000000000000000000000000000000000000000000000000000000000000000000000000000000000000000000000000000000000000000000000000000000000000000000000000000000000000000000000000000000000000000000000000000000000000000000000000000000000000000000000000000000000000000000000000000000000000000000","logs":[],"transactionHash":"0xda9a004e34aa7e357576d22ba4ac0a33b59afcbe17705a7e3831771a04968bac","contractAddress":"0x0000000000000000000000000000000000000000","gasUsed":"0xb9a5","blockHash":"0x819ad47f3df939fb8dc5adaf8ccc40cf9e30538855eb661f24ea282e2e232bf5","blockNumber":"0xffbfa8","transactionIndex":"0x6a"} |
Receipt를 가져온 김에, 여기서 해결할 수 있는 것들을 바로 살펴본다.
Block
Receipt.blockNumber
Block Confirmation
Receipt.blockNumber 이후로 몇 개의 블록이 생성되었는지 출력해주면 된다. 최신 블록 번호를 가져와서 빼주자.
Other Attributes.Position In Block
Receipt.transactionIndex
Usage by Txn
Receipt.gasUsed
Timestamp
블록 번호로 블록을 가져와 값을 채워준다.
GasFees.baseFee
블록 번호로 블록을 가져와 값을 채워준다.
Transaction과 그에 대한 Receipt를 가져온 것만으로 대부분의 데이터를 채워줄 수 있다. 나머지 데이터도 마저 살펴보자.
Transaction Fee, Gas Price, Burnt & Txn Savings Fees, |
From
From 값은 To와 트랜잭션의 서명 값으로부터 구할 수 있다. 여기서는 Golang으로 구하는 로직만 다루며 어떻게 To와 서명 값으로부터 From을 유도해낼 수 있는지에 대해선 다루지 않는다. 다른 언어로 해당 기능을 구현해야 한다면 ecrecover라는 키워드로 검색해보자.
- 실제 계산하는 로직을 살펴보고 싶으면 해당 1, 2, 3 참조
import "github.com/ethereum/go-ethereum/core/types"

func calcFrom(tx *types.Transaction) common.Address {
	msg, err := tx.AsMessage(types.LatestSignerForChainID(tx.ChainId()), nil)
	if err != nil {
		panic(err)
	}

	return msg.From()
}

// *** 2023-04-10 추가 ***
// AsMesasge말고 Sender 사용
// https://github.com/ethereum/go-ethereum/issues/26915
func calcFrom(tx *types.Transaction) common.Address {
    sender, err := types.Sender(types.LatestSignerForChainID(tx.ChainId()), tx)
    if err != nil {
        panic(err)
    }

    return sender
}
Gas Price, Transaction Fee, Burnt & Txn Savings Fees
해당값들은 블록 페이지 분석에서 다뤘던 EIP-1559를 참조하여 계산한다.
Tip = min(maxPriorityFeePerGas, (maxFeePerGas - baseFee))
Gas Price = Tip + baseFee
Transaction Fee = Gas Price * Gas Used
Burnt Fee = base Fee * Gas Used
Txn Savings Fee 는 이름만으로는 어떤 값인지 유추하기 힘들다. 해당 필드는 트랜잭션을 보낸 사용자가 지불할 것이라고 생각했던 최대 가스비와 실제 지불한 가스비의 차액이다. 즉 계산해보자면,
maxFee = max(maxPriorityFeePerGas, (maxFeePerGas - baseFee)) * Gas Used
Txn Savings Fee = maxFee - Transaction Fee
이와 같다.
ERC-721 Tokens Transferred...},
|
ERC-20 Tokens Transferred || ERC-721 Tokens Transferred
해당 필드는 트랜잭션의 결과로 ERC-20, ERC-721의 Transfer 이벤트가 발생하면 그 리스트를 보여주고 있다.


만약 존재하지 않는다면 해당 필드는 아예 생략된다.
이를 구현하는 것은 매우 많은 방법이 존재할 것이지만, 크게 본다면 결국 비슷하다. Receipt의 Logs 필드를 조사하고, 찾고 있는 이벤트가 존재하는지 확인 후 이를 디코딩하여 출력하는 것이다.
예시로 ERC-20 Tokens Transferred를 구현한다고 생각해보자.
먼저 ERC-20의 Trasnfer 이벤트 ID를 구한다.
ERC-20 Transfer 이벤트 Signature -> Transfer(address,address,uint256)
-> Keccak256('Transfer(address,address,uint256)')
-> ddf252ad1be2c89b69c2b068fc378daa952ba7f163c4a11628f55a4df523b3ef
Receipt의 Log 구조는 아래와 같다.
type Log struct {
	// Consensus fields:
	// address of the contract that generated the event
	Address common.Address `json:"address" gencodec:"required"`
	// list of topics provided by the contract.
	Topics []common.Hash `json:"topics" gencodec:"required"`
	// supplied by the contract, usually ABI-encoded
	Data []byte `json:"data" gencodec:"required"`

	// Derived fields. These fields are filled in by the node
	// but not secured by consensus.
	// block in which the transaction was included
	BlockNumber uint64 `json:"blockNumber"`
	// hash of the transaction
	TxHash common.Hash `json:"transactionHash" gencodec:"required"`
	// index of the transaction in the block
	TxIndex uint `json:"transactionIndex"`
	// hash of the block in which the transaction was included
	BlockHash common.Hash `json:"blockHash"`
	// index of the log in the block
	Index uint `json:"logIndex"`

	// The Removed field is true if this log was reverted due to a chain reorganisation.
	// You must pay attention to this field if you receive logs through a filter query.
	Removed bool `json:"removed"`
}
Log.Topics 첫 번째 인덱스는 해당 이벤트의 ID를 갖고 있다.
간략한 정보를 더하자면, 이벤트에 indexed가 붙어 있으면 Log.Topics에 append되어 Receipt가 만들어지고, indexed가 붙어 있지 않다면 Log.Data에 들어간다. 이더리움의 이벤트는 보통 indexed를 3개 밖에 붙이지 못하는데 Log.Topics의 0번에는 이벤트 ID가 들어가고, 이더리움 LOG OPCODE는 LOG0, LOG1, LOG2, LOG3, LOG4 이렇게 다섯 개만 존재하여 Log.Topics의 최대 길이가 4이기 때문이다(즉, 0번은 이벤트 ID, Indexed 최대 3개).
** anonymous 이벤트는 예외, 여기서 다루지는 않음
이제 Receipt.Logs 중에 내가 원하는 이벤트가 생성되었다면 리턴하는 로직을 추가하면 끝이다.
var transferEventID = "ddf252ad1be2c89b69c2b068fc378daa952ba7f163c4a11628f55a4df523b3ef"

func includeTransferEvent(receipt *types.Receipt) ([]*types.Log) {
    res := make([]*types.Log, 0)
    for _, log := range receipt.Logs {
    	if log.Topics[0].Hex() == transferEventID {
        	res = append(res, log)
        }
    }
    return res
}
이를 이용한다면 ERC-20, ERC-721의 Transfer 뿐만 아니라, 내가 만든 컨트랙트에 대한 이벤트가 만들어졌을 때 익스플로러에 추가하는 등의 작업도 충분히 할 수 있다.
단, 여기에는 하나 문제가 존재하는데 이벤트 Signature가 완전히 똑같은 경우다.
이벤트 ID는 keccak256 해시 함수를 사용하여 구하기 때문에 이벤트 Signature가 완전히 똑같다면 이벤트 ID도 동일하다.
ERC-20과 ERC-721에는 Transfer 이벤트가 존재한다.
// ERC-20
Transfer(address from, address to, uint256 tokens)

// ERC-721
Transfer(address from, address to, uint256 tokenId)
그리고 이를 이벤트 Signature로 변환해서 본다면,
Transfer(address,address,uint256) 으로 완전히 동일한 이벤트 Signature를 갖게 되고, 동일한 이벤트 ID를 가질 것이다.
그렇다면 이더스캔에서는 어떻게 ERC-20 Tokens Transferred, ERC-721 Tokens Transferred로 구분해서 보여줄까?
나는 컨트랙트 타입과 컨트랙트 어드레스를 매핑해놓은 DB를 따로 관리하지 않을까 추측하고 있다. 꼭 이를 구분하기 위해서만 저장하진 않을테고 '토큰 전송 트랜잭션 리스트', 'NFT 전송 트랜잭션 리스트'와 같은 페이지에서도 사용하겠다.
Transfer 이벤트 ID를 가진 Log가 발생하면, 이벤트가 발생한 Contract 주소가 DB에 존재하는지 확인하고 ERC-20에 속한다면 ERC-20 Tokens Transferred, ERC-721에 속한다면 ERC-721 Tokens Transferred를 뿌려주는 식으로 사용하지 않을까?
'블록체인' 카테고리의 다른 글
| [이더리움] chainID, networkID (0) | 2023.04.27 |
|---|---|
| [이더리움] Access list (0) | 2023.04.12 |
| [이더리움] Multicall contract (0) | 2023.04.08 |
| [이더리움 코어] Connection (0) | 2023.03.21 |
| 이더스캔 분석 1 - 블록 페이지 (1) | 2023.02.26 |


